Why Traditional Blush Placement Ages You After 40
The question of how to apply blush over 40 reveals a critical disconnect between standard beauty advice and facial anatomy changes. The classic instruction to apply blush on the apples of your cheeks—that rounded area that pops when you smile—was designed for faces with full, high cheekbones and elastic skin. After 40, facial fat pads migrate downward due to gravity and collagen loss, bone resorption reduces cheekbone prominence by approximately 10-15%, and skin elasticity declines enough that smiling no longer creates the same rounded apple effect. This means traditional placement now sits lower on your face than it did at 25, emphasizing jowls and dragging your features downward instead of lifting them.
What anatomical research reveals about where to apply blush on mature face structures specifically: the malar fat pad that gave your mid-face youthful fullness descends by approximately 1-2mm annually after menopause, while the submalar area hollows as deeper fat compartments atrophy. This creates a dual problem—you lose volume where you want color and dimension, while gaining sagging in areas where blush will only emphasize downward pull. The standard smile-and-apply technique places color exactly where your face has descended, making you look tired and older rather than fresh and healthy.
The critical insight that transforms blush application: placement must shift higher and more toward your temples to compensate for gravitational changes. This feels unnatural initially because it's not where you see color when you naturally flush. But strategic placement creates optical lift by drawing the eye upward and outward, counteracting the downward migration your facial structure has undergone. Understanding how to apply blush over 50 and how to apply blush over 60 requires progressive adjustments as facial changes accelerate with each decade. For comprehensive guidance on all makeup adaptations, see our complete makeup guide for menopausal skin changes.
The Blush Myths Sabotaging Your Appearance
Myth 1: Powder Blush Works Better Than Cream
The conventional wisdom about powder blush providing better longevity made sense when your skin had natural oils to help it adhere. But on mature skin with compromised moisture barriers, powder blush settles into every enlarged pore and fine line, emphasizing texture while simultaneously fading within hours as it absorbs into dehydrated skin. Cream blush formulas contain emollients that hydrate while providing color, creating a natural flush that looks like it's coming from within rather than sitting on top. The trade-off? Cream requires slightly more skill to blend and may need setting with translucent powder in very oily zones, but the dimensional, healthy glow it creates on mature skin is impossible to achieve with powder.
Myth 2: Blush Should Match Your Natural Flush
Here's what beginners misunderstand about color selection for mature skin: your natural flush color after 40 is influenced by broken capillaries, rosacea, and reduced circulation—not the healthy pink or peach tones you had at 25. Matching your current natural flush often means choosing ruddy, red-toned colors that emphasize rather than correct skin concerns. What experienced practitioners do differently is select blush colors slightly warmer and more muted than their youthful flush—soft corals, warm roses, or terracotta tones that add healthy dimension without looking artificial or exacerbating redness. Cool-toned pinks that look fresh on young skin often read as bruise-like on mature faces with altered undertones.
Myth 3: More Blush Compensates for Pallor
The misconception about intensity: when mature skin looks washed out due to reduced circulation and pigment changes, the instinct is to apply more blush for visible color. But heavy-handed application creates distinct edges that look painted-on rather than natural, particularly as skin texture becomes uneven. The evidence shows that buildable, sheer layers create more convincing dimension than one heavy application. Start with the barest hint of color, assess in natural light, and add incrementally. On mature skin, you want color that suggests healthy circulation, not dramatic definition that draws attention to where makeup ends and bare skin begins.
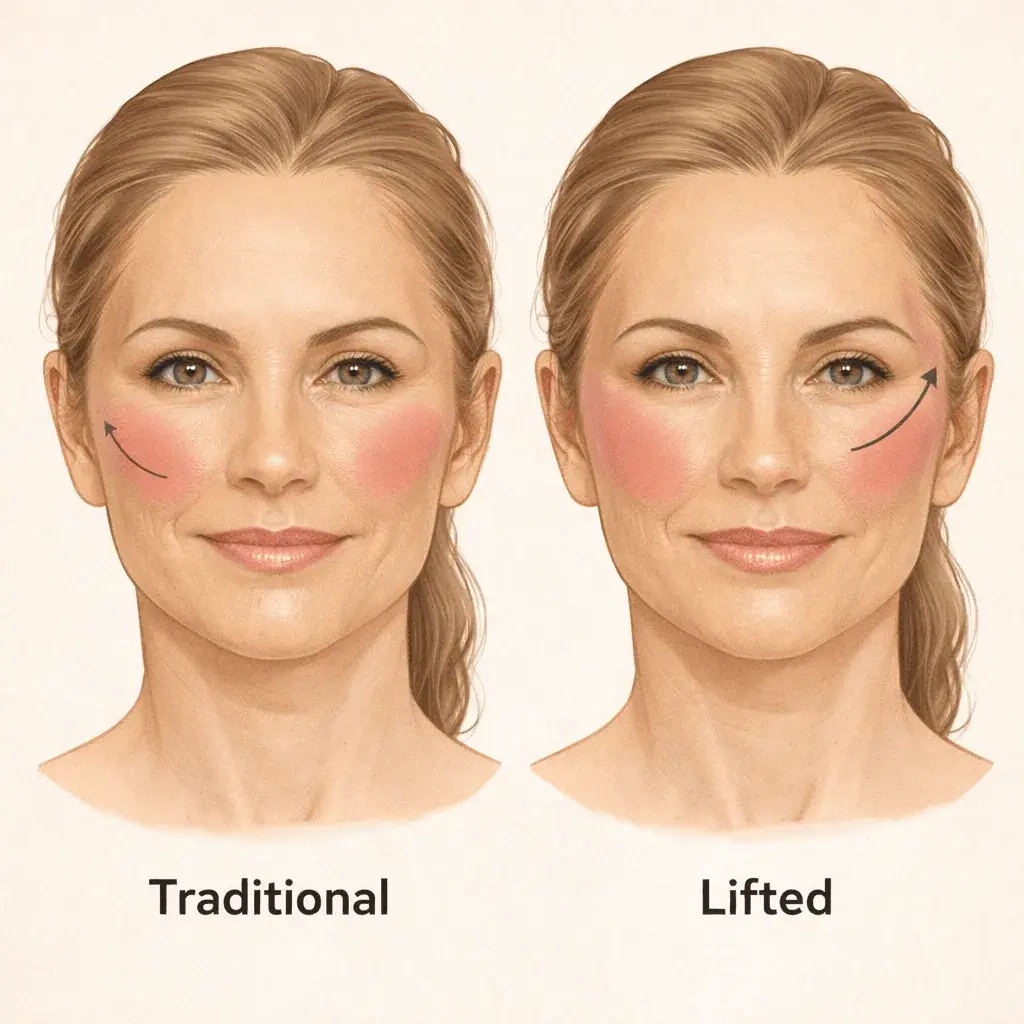
The Precise Placement Technique That Lifts Your Face
The most effective blush application for mature faces requires abandoning every placement rule you learned and starting with facial anatomy as your guide. Your new landmark isn't the apple of your cheek—it's the highest point of your cheekbone, which you locate by gently pressing along the bone structure starting at your ear and moving toward your nose. This creates a diagonal line from your ear toward the outer corner of your eye. All blush application should occur above this line and should blend upward and outward toward your temple, never downward toward your jawline.
Your step-by-step application technique by decade:
- How to apply blush over 40: Begin at the high point of your cheekbone (typically level with the outer corner of your eye) and apply cream blush in a C-shape that curves up toward your temple. Use your ring finger or damp beauty sponge to press and blend upward in small circular motions. The color should be most intense at the cheekbone apex and gradually fade as it moves toward the temple and hairline.
- How to apply blush over 50: As facial descent becomes more pronounced, shift placement even higher—starting approximately one finger-width above where you placed blush at 40. The application area becomes more horizontal, running along the upper cheekbone and extending well into the temple area. Avoid bringing color too close to your nose, as this can emphasize nasolabial folds. Keep the inner boundary at the outer edge of your iris when looking straight ahead.
- How to apply blush over 60: With significant volume loss and jowl formation, blush placement becomes almost horizontal along the upper cheekbone to temple line. Think of creating a lifted ribbon of color that starts at the outer corner of your eye and sweeps back toward your ear. Use the lightest touch with buildable layers—mature skin shows every application stroke, so multiple sheer layers blend more seamlessly than attempting to achieve intensity in one application.
Formula and tool selection amplifies technique effectiveness. Cream blush in stick or palette form provides the hydration and flexibility mature skin needs—look for formulas containing hyaluronic acid, squalane, or vitamin E that nourish while adding color. Apply with either your ring finger warmed slightly by rubbing fingers together (this melts cream formulas for seamless blending) or a damp stippling brush that presses color into skin rather than dragging across the surface. Avoid traditional blush brushes designed for powder—their firm bristles create too much friction on delicate mature skin. For comprehensive product recommendations, explore our guide to the best makeup for women in their 40s.
When Standard Placement Techniques Fail
Here's the edge case that derails even expert placement advice: some women develop such pronounced jowls and mid-face hollowing that any color placed on the cheekbone area—no matter how high—creates unflattering contrast with the shadowed hollows below, making the sagging appear more severe rather than disguised. This typically occurs with significant weight loss, after certain medical treatments, or as genetic bone structure combines with advanced age-related volume loss. The standard lift-and-brighten approach assumes you have relatively even facial fullness to work with, even if it's descended. When you don't, strategic blush placement paradoxically highlights exactly what you're trying to minimize. The solution requires abandoning cheek color entirely and instead using blush exclusively on areas that haven't hollowed: a wash of warm color across the forehead near the hairline, a soft flush across the bridge of the nose and extending onto upper cheeks (avoiding the hollow completely), or color concentrated only in the temple area that creates the illusion of a continuous plane from temple to outer cheek. Additionally, this severe hollowing often requires addressing through volumizing skincare, facial massage to stimulate circulation, or cosmetic interventions like fillers before makeup alone can create satisfactory results. The limitation is that these alternative placement zones don't provide the same facial sculpting and lifting effect that traditional cheek blush offers—you're trading structural definition for overall warmth and healthy color. Some women find this acceptable, particularly if they compensate with strategic highlighting on the actual bone structure to create dimension without blush. Others feel the loss of that defining element too keenly and pursue medical solutions specifically to restore the facial volume necessary for traditional blush placement to work again. This represents a threshold where makeup technique alone cannot overcome anatomical changes, forcing a choice between accepting alternative approaches or seeking intervention beyond cosmetics.