Why Cream Foundation Techniques Must Change During Menopause
The application method that created flawless results at 35 now causes streaking, patchiness, and texture emphasis at 55. This isn't technique failure—it's your skin fundamentally changing how it interacts with foundation. Declining estrogen reduces skin's natural moisture by approximately 50% while thinning the epidermis and creating micro-textural changes invisible to the eye but critical to makeup application. Cream foundation that once glided smoothly now catches on dry patches, settles into emerging fine lines, and emphasizes the crepey texture developing as collagen depletes.
The absorption paradox: Younger skin's robust moisture barrier prevents foundation from sinking in too quickly, allowing time for blending. Menopausal skin with compromised barrier function absorbs cream foundation faster—sometimes too fast—leaving you with patchy coverage or visible application lines as product sets before you finish blending. This requires working in smaller sections with faster blending motions than you used previously, or switching to application tools that deposit and blend simultaneously rather than sequentially.
What beginners misunderstand: they assume cream foundation's richer texture automatically works better on dry mature skin. In reality, cream foundation can be ideal for menopausal skin, but only when applied with techniques specifically adapted to thinning, drier, more textured skin. The same buffing or rubbing motions used on younger complexions now drag on delicate mature skin, disturb underlying skincare, and emphasize rather than blur imperfections. Your complete makeup approach during menopause requires this technical evolution.
Common Application Mistakes That Emphasize Aging
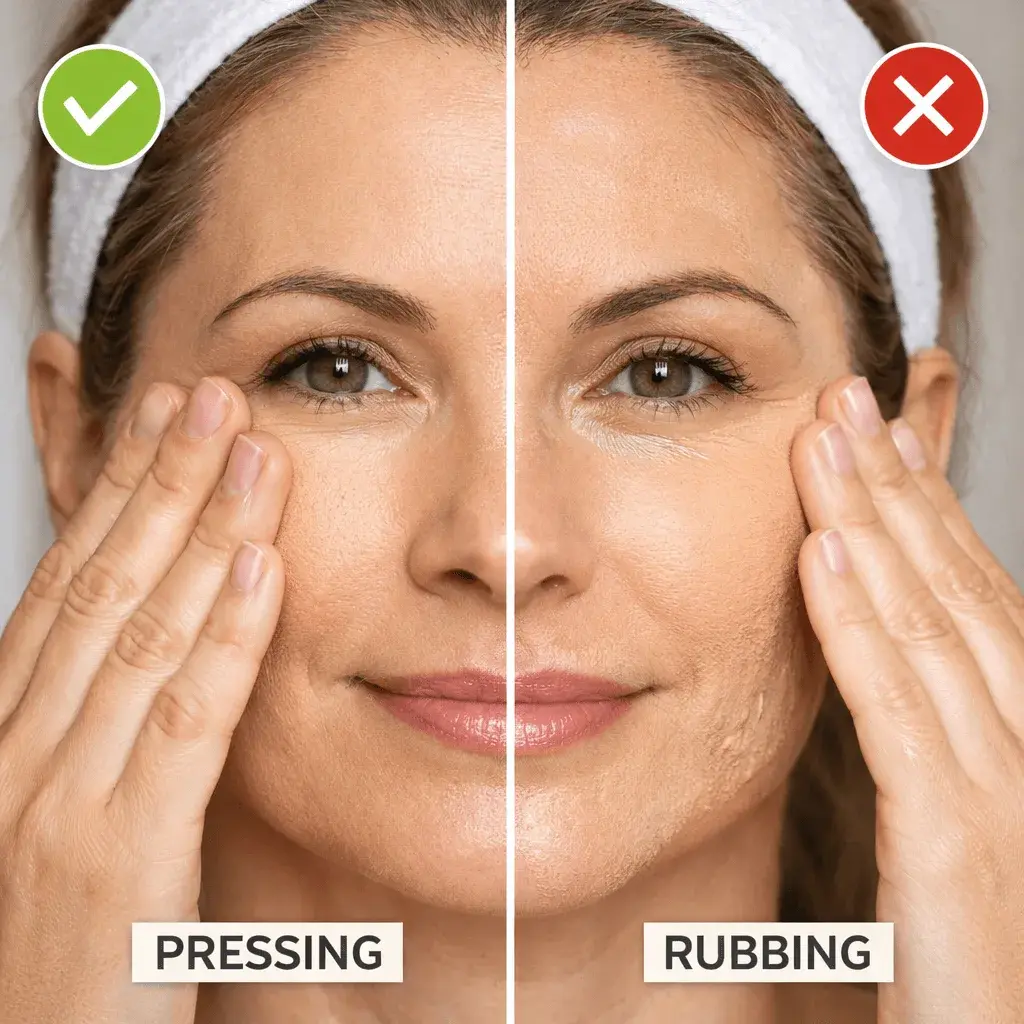
Misconception #1: Buffing foundation in circular motions creates airbrushed finish. The reality on mature skin: circular buffing creates friction that disturbs the moisturizer underneath, causing pilling and uneven coverage. It also tugs on skin losing elasticity, potentially worsening sagging over time. Pressing or stippling motions deposit cream foundation without dragging, creating smoother results that don't emphasize texture or disturb the hydrating base essential for makeup success on menopausal skin.
Misconception #2: Applying foundation to your entire face at once ensures even coverage. The contradiction: cream foundation sets faster on dry mature skin than it did on younger complexions. By the time you blend one area, foundation applied to other areas has already dried down, creating visible demarcation lines. Work in sections—forehead, then each cheek, then nose and chin—blending each completely before moving to the next. This prevents the patchy, obviously applied appearance that occurs when product sets unevenly.
The edge case where cream foundation fails: If you have extremely oily skin persisting through perimenopause or severe rosacea with inflamed, reactive skin, traditional cream foundations may be too heavy or occlusive. You need lightweight, breathable alternatives or tinted moisturizers that provide coverage without exacerbating your specific concerns. Learn more about selecting appropriate foundation formulas for your skin type during hormonal changes.
The Best Application Method for Mature Skin
Preparation that determines 70% of results: Apply hydrating serum, wait 90 seconds, then lightweight moisturizer, wait another 2 minutes. This layered hydration plumps skin and creates the smooth base cream foundation needs to blend seamlessly. Skipping wait times causes pilling—foundation mixing with wet skincare rather than sitting on top of absorbed product. If you have combination skin, use richer moisturizer on dry areas, lighter on any remaining oily zones. The foundation will only look as good as the skincare base allows.
Tool selection that matters: A damp beauty sponge outperforms brushes or fingers for cream foundation on mature skin. Dampen the sponge, squeeze out excess water, then use gentle bouncing motions to press foundation onto skin. The moisture in the sponge helps cream foundation blend seamlessly without dragging, while the bouncing motion deposits product without friction. Change to a clean section of the sponge for each facial area to prevent pushing around product that's already setting.
The strategic application sequence:Start with the center of your face where you typically need the most coverage—around nose, any redness or discoloration. Apply small amounts and build gradually. Use less product as you move outward toward hairline and jawline where skin is often clearer. This creates natural-looking dimension rather than a flat, uniform mask. Blend carefully into hairline and down neck to avoid visible demarcation—use whatever product remains on your sponge for these areas rather than adding fresh foundation.
Handling Problem Areas on Mature Skin
What experienced users discover: different facial areas require different approaches on menopausal skin. Around eyes where skin is thinnest, use the absolute minimum cream foundation—often just what's left on your sponge after applying to cheeks. Use a light tapping motion with your ring finger to blend, never rubbing. For smile lines and marionette lines, apply foundation in the direction of the line rather than across it, using gentle pressing to avoid buildup in creases.
The forehead challenge: Horizontal forehead lines trap foundation easily, creating visible stripes. Apply cream foundation in upward strokes following your natural skin texture, then immediately press gently with a damp sponge using downward motions to remove any excess sitting in lines. Work quickly before product sets. If lines remain visible, you're using too much product in this area—forehead often needs half the amount you apply to cheeks despite being a larger surface area.
The honest limitation: even perfect technique can't fully prevent cream foundation from settling into deep lines during extended wear on very dry, crepey mature skin. Accept that some settling is inevitable after 6-8 hours. A mid-afternoon refresh with hydrating mist and gentle pressing redistributes foundation without adding more product. This realistic expectation prevents the frustration of chasing impossible perfection and allows you to enjoy the beautiful results cream foundation does provide when properly applied.

Troubleshooting Common Cream Foundation Problems
Problem: Foundation looks patchy or streaky—Your skin isn't adequately hydrated, or you're working too slowly and foundation is setting before you finish blending. Solution: Increase skincare hydration, work in smaller sections with faster blending, or switch to a slightly more emollient cream foundation formula. Dry patches need extra moisturizer before foundation application—don't try to compensate by adding more foundation which makes patchiness worse.
Problem: Foundation emphasizes fine lines and texture—You're using too much product or your application tool is dragging on skin. Solution: Reduce the amount significantly—cream foundation is concentrated and a little goes far on mature skin. Use only pressing or bouncing motions, never rubbing or buffing. Consider whether you need primer in textured areas—sometimes primer helps, but heavy silicone primers can actually worsen settling by creating a slippery surface foundation slides across rather than adhering to.
Problem: Foundation separates or looks blotchy by midday—Either your moisturizer and foundation aren't compatible (water-based moisturizer with oil-based foundation causes separation), or you're in an extremely dehydrating environment. Solution: Ensure both skincare and foundation are either water-based or oil-based, not mixed. In dry environments, use a hydrating mist mid-morning before separation begins, pressing gently with clean fingers to redistribute foundation rather than waiting until it looks bad.
What changes from early to late menopause: in early perimenopause, you might successfully apply cream foundation with a brush or even fingers. By post-menopause with thinner, drier skin, the damp beauty sponge technique typically becomes mandatory for acceptable results. The amount of product needed also decreases—what required 1.5 pumps at 45 looks heavy with one pump at 58. Reassess technique and quantity annually rather than assuming what worked last year still applies.
The setting consideration: Cream foundation on dry mature skin rarely needs powder setting—it often makes texture more apparent. If you must set, use only the tiniest amount of translucent powder pressed on with a damp sponge in areas prone to creasing (under eyes, smile lines), leaving the rest of your face with cream foundation's natural satin finish. This selective setting prevents creasing in problem areas without creating the flat, obviously powdered appearance that ages mature skin.